


14 Step Installation Laminate Flooring
Installation guide of laminate flooring with 14 easy steps to get the most complete wood floor for interior space.
Preparation steps:
The steps below are taken step by step in detail to guide customers to install themselves at home.
Step 1: Prepare the necessary tools:
To perform effective and accurate construction we need the following tools:
Pencil
Square ruler
Sawing
Hammer
Measure
Wedges
Styrofoam.
Floor surface is always flat, not concave.
Step 2: Identify the direction of light
In terms of aesthetics, the wooden floor should be placed parallel to the direction of the incoming light.
Step 3: Divide the area for correct installation
If the mounting area of the room is larger than 100m2, divide the floor into reasonable parts so that the floor is not too wide, you should use a T-brace to connect the divided distance.
Step 4: Noise canceling for the floor
Use foam on waterproof floors and reduce noise.
Step 5: Align the spacing
Before the installation, calculate the final row that is not smaller than 50mm, starting from the durable left wall, bringing the cross-section to the wall.
* Note:
4 contact faces 10 -15mm away from the wall, when mounting, insert a small wedge so that when installed, it will not narrow.
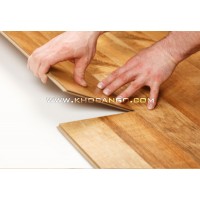
Step 6: Installation of the floor
Place the second plank on the side of the wedge and then gradually lower so that it fits the first plank edge, gently push the 2nd board onto the 1st board and continue to the end of the row.
Worting yin and yang: Each board has grooves when connected together, it will fit tightly together.
Step 7: Measure and cut
Measure and truncate the last board in the first row, the part to be cut can use the 2nd row, but the minimum length is 30cm.
Step 8: Installation of the floor
Apply the same method of the first row to the 2nd row.
Step 9: Assembly
Tilting the 2nd row brings the mole edge to the 1st row.
Step 10: Installation of the floor
Gently push the boards inward until the boards fit and lie flat against the floor.
Step 11: Layout of wooden boards
The 4th row onwards uses the same method as row 2,3, but the mounter's position changes according to the figure below.
Step 12: Align, adjust the edge
Cut holes in wooden panels to fit around floor fixtures (columns, ...) which have a distance of 10mm from the board to the fixture so that the floor can expand.
Step 13: Measure the dimensions to complete the floor
For the last row, measure how much distance is left with a pencil, and then cut the stick to fit the remaining distance of the wall.
Step 14: Finishing floor, fitting accessories
Unplug the original mounting wedge, insert the baseboard into the floor.
Can go electrical wires, network wires in the wooden floor accessories.
Once installed the laminate floor can be used immediately! Contact us for further advice.


.png)


comment(s)