




Hướng Dẫn Thi Công Sàn Gỗ Xương Cá Chuẩn Kỹ Thuật – Gọn, Nhanh, Đẹp Mắt
Sàn gỗ xương cá đang là xu hướng nội thất cao cấp & sang trọng được yêu thích tại Việt Nam. Tuy nhiên, nhiều khách hàng, và ngay cả thợ thi công, vẫn còn “lấn cấn” trong cách thi công đúng chuẩn để lên được đúng kiểu, không lệch trục, không phồng hèm.
📍 “Thi công sàn xương cá không khó, chỉ cần đúng kỹ thuật – đúng kiểu hèm – đúng người hướng dẫn.”
Sàn gỗ xương cá đang là xu hướng nội thất cao cấp & sang trọng được yêu thích tại Việt Nam. Tuy nhiên, nhiều khách hàng, và ngay cả thợ thi công, vẫn còn “lấn cấn” trong cách thi công đúng chuẩn để lên được đúng kiểu, không lệch trục, không phồng hèm.
Vậy, làm sao để thi công sàn xương cá vừa đẹp vừa bền, tránh các lỗi kỹ thuật tốn kém về sau?
🔍 1. Sàn gỗ xương cá là gì?
Sàn xương cá (Chevron, Herringbone) là kiểu lát sàn mà các tấm ván gỗ được lắp theo hình chữ V hoặc hình xương cá, tạo hiệu ứng không gian độc đáo, thanh lịch và có chiều sâu.
📐 Có 2 kiểu xương cá phổ biến:
-
Xương cá Chevron 45°: 2 đầu ván được cắt vát 45 độ, ghép lại thành mũi nhọn đều – kiểu cổ điển châu Âu
-
Xương cá Herringbone 90° (kiểu V): 2 đầu ván vuông góc, lắp thành hình chữ V đan xen – hiện đại, mềm mại
2. Những dòng sàn gỗ có thể lắp kiểu xương cá
Không phải dòng sàn nào cũng thi công được kiểu xương cá. Dưới đây là các sản phẩm phổ biến tại Kho Sàn Gỗ chuyên dành cho thi công dạng này:
| Dòng sản phẩm | Kiểu xương cá | Đặc điểm nổi bật |
| 3K Art | 45° + 90° | Lắp được cả Chevron 45° và V-Line 90°, giá tiết kiệm |
| Dream Classy 8mm | 90° | Cốt xanh, thi công xương cá 90°, giá tốt |
| Dream Lux 12mm | 90° + thẳng | Cốt đen, bề mặt EIR, hiệu ứng vân nổi chân thực |
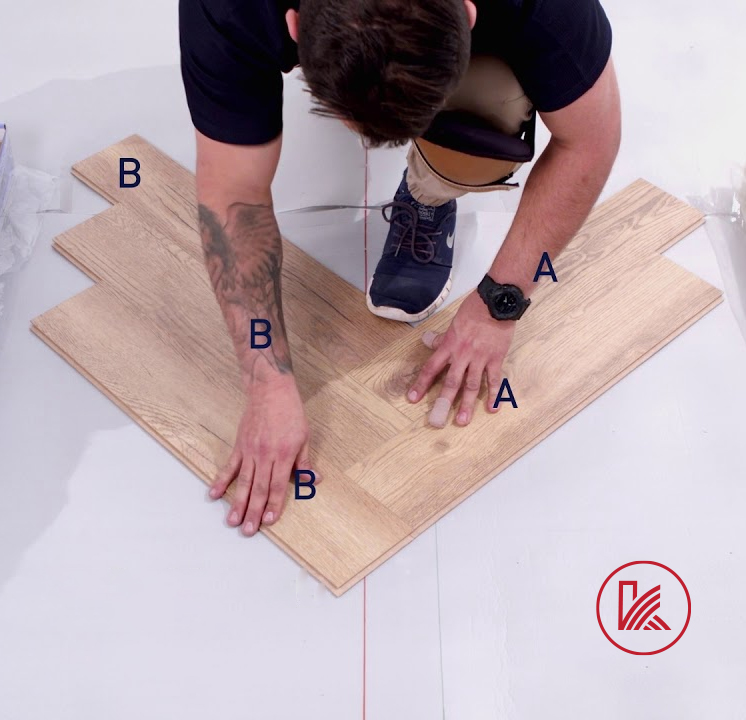
💡 Lưu ý: Sàn thường có mã riêng cho A – B (trái/phải), không thể lắp sai chiều.
📦 3. Chuẩn bị vật tư & phụ kiện🔧 Vật tư cần có:
|
 |
📐 Cách tính số lượng:
Do phần ghép xương cá có cắt gọt nhiều hơn lát thẳng, hãy dự tính số lượng vật tư dư ít nhất 7–10% so với diện tích sàn cần lát.
🧱 4. Các bước thi công sàn gỗ xương cá chuẩn kỹ thuật
✅ Bước 1: Xác định trục trung tâm
📏 Dùng dây mực hoặc laser để tạo đường thẳng trục chính giữa. |
✅ Bước 3: Lắp ván từ giữa ra hai bên
💡 Nếu ván lệch nhẹ – có thể dùng chốt định vị hoặc nẹp giữa để giữ chuẩn form. |
✅ Bước 2: Trải xốp lót chống ẩm
|
✅ Bước 4: Lắp phần viền ngoài và cắt gọt
|
✅ Bước 5: Gắn nẹp, len chân tường & hoàn thiện
|
🧠 5. Lưu ý quan trọng khi lắp sàn xương cá⚠️ Không lắp xương cá nếu:
⚠️ Không trộn lẫn A – B: vì lắp sai sẽ không ra hình chữ V ⚠️ Luôn thử ghép “mockup” 1m² trước khi thi công toàn bộ |
🏡 7. Ưu – nhược điểm của sàn xương cá
| Ưu điểm | Nhược điểm |
| Sang trọng, tạo chiều sâu không gian | Thi công khó hơn sàn thẳng |
| Thể hiện gu thẩm mỹ cao | Tốn thời gian, vật tư hơn |
| Tăng giá trị thẩm mỹ cho nội thất | Giá lắp đặt cao hơn 10–15% |
📍 Tất cả đều có sẵn hàng, được thi công bởi đội thợ chuyên xương cá chuẩn chỉnh.
Nếu bạn yêu thích sự phá cách, hiện đại, tinh tế cho không gian sống – thì sàn gỗ xương cá chính là lựa chọn đắt giá.
Nhưng để có được hiệu ứng đẹp đúng chuẩn – thi công đúng kỹ thuật – bền vững lâu dài, bạn cần:
✅ Dòng sàn phù hợp (có thiết kế A – B)
✅ Đội thi công chuyên nghiệp
✅ Tư vấn chính xác từ đầu
Liên hệ ngay KHO SÀN GỖ tư vấn báo giá thi công trọn gói, làm đẹp nhà cửa cùng KHO SÀN GỖ





bình luận
Vui lòng đăng nhập để bình luận bài viết này.